
https://www.amazon.com/exec/obidos/A...im/refuge08-20
This gauge is designed to be mounted to the handle bar bolts, ahead of the handle bar. A fairing covers my bars and there is no room to mount it in that way. I will use my mirror mount and extend the bracket with some aluminum stock. The gauge also needed to be remounted 180 degrees in the stock bracket for my use. Wiring directions below.
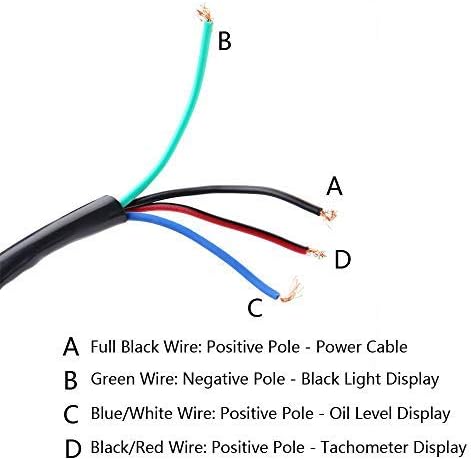
I found a good power source under my “hood”. It was the positive pole of my cigarette lighter outlet. However, it is unswitched (it’s powered up even when the scooter is turned off and key removed.
Since I will use this gauge only for time/distance events, and the only good power source I found was unswitched, I decided to wire it to a cigarette lighter cable, and just plug it in when needed.
I made a temporary connection for the tach as well, since it will only be used occasionally for tuning. I connected it to the red pole on my ignition coil, below the fairing under the seat on the right side. All that is left to do is attach the speedo cable.
……………………………………………………………………….
Two steps forward and one step back today.
-Speedo cable was too short for my current mounting position.
I mounted the speedo lower, to adopt the shorter cable, but this lower mount failed. (stripped out).
-I was able to program the new instrument using the single set button. Big relief. Made a quick parking lot ride and found the speedo and odo to be working.
I also programmed the tach for my single cylinder. Instructions for the instrument programming were easy to follow.
-I need to veriify speedo accuracy with GPS. I only have one accessory outlet, bit I need to plug in both the speedo and GPS into one 3amp outlet. I found an old adaptor that accepts the cig lighter plug and then clamps onto the battery terminals. However, the clamps were rusted beyond usability (from living near the beach a few years back).
-I cannibalized better clamps from a newer battery charger, but ran out of daylight.
-Soooo.. tomorrow I hope to successfully remount the instrument to accommodate the shorter speedo cable and verify speedo accuracy with GPS with a road test.
………………………………………………………………………………………
I modded my first bracket to accommodate the short speedo cable. Now I can test the new speedo against the GPS. The new speedo is 8mph optimistic at 52mph. That is the same result as my OEM speedo. looks like this $23 speedo/odo/tach from Amazon actually works. I'm ready for that time/distance rally now.