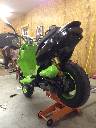
New pictures to show off the NEW Cheeky Seats seat cover that just came in for the Red 125 - Great RED Piping to give it that custom edge - Big Kudos to Suzy! Enjoy...
Just got the Buddy red 125 back from being in Austin for two years and first had to wash it then pulled the cowl protectors and rear rack, cleaned, sanded painted them fresh flat black, replaced bolts and washers as needed, installed the black out kit, replaced left brake handle, used Meguiar’s Ultimate Black for all the black body parts, Motorcycle Leather Cleaner/Conditioner for the seat & Motorcycle Plastic Cleaner/Polish for the windshield and red body parts. Charged the battery while working on other parts. Pulled the carb and cleaned that then after a slight warm up, did an oil/filter change before setting off to fill up with gas, add Lucas and grab a few pictures. What a day! This scoot got more love today than the past two years yet should be good to go for another year!
The daughter will be glad to be back on her scooter after today!
BLACK OUT KIT - with NEW Cheeky Seats Seat Cover
Moderator: Modern Buddy Staff
-
MYSCTR
- Member
- Posts: 1007
- Joined: Fri Jun 26, 2009 9:39 pm
- Location: McKinney Texas
BLACK OUT KIT - with NEW Cheeky Seats Seat Cover
- Attachments
-
- Black Out Kit & Meguiar's Products
- 0916.jpg (137.38 KiB) Viewed 3741 times
-
- Black Out Kit & Meguiar's Products
- 0923.jpg (131.46 KiB) Viewed 3741 times
-
- Seat cover by Cheeky Seats
- DSCN1105s.jpg (98.79 KiB) Viewed 3361 times
Last edited by MYSCTR on Sat Dec 05, 2015 8:20 pm, edited 3 times in total.

-
theflash784

- Member
- Posts: 293
- Joined: Wed Jun 15, 2011 2:47 pm
- Location: Rochester Michigan
Black OUt Kit
That is one NICE looking scoot!
-
SuperCyclone.81
- Member
- Posts: 282
- Joined: Sat Jan 21, 2012 10:53 pm
- Location: Fayetteville Arkansas
-
batgirl101

- Member
- Posts: 268
- Joined: Sun Jun 26, 2011 5:22 am
- Location: San Francisco
-
MYSCTR
- Member
- Posts: 1007
- Joined: Fri Jun 26, 2009 9:39 pm
- Location: McKinney Texas
Hours and Hours and Hours
Well all total with installing a new left brake handle, giving the entire scoot a major wash and deep clean including washing the insides of each body panel that was removed, removing the cowl protectors, rear rack & re-painting them, an oil change, pulling the carb to clean the jets probably just about 8 hours.
To do the actual black mods I would guess about 2 hours including the mirrors (and re-installing the windshield).
Just re-washed and finished the prep to go deliver it tonight as she is so ready to start riding again.
Thanks for the comments. We do like the finished look. Just a couple if things that could be changed out yet this will work for the Fall.
-
climbguy
- Member
- Posts: 36
- Joined: Wed Aug 07, 2013 1:22 pm
- Location: Washington, DC
-
cyclewhitman
- Member
- Posts: 31
- Joined: Fri Aug 30, 2013 2:51 am
- Location: Kansas City, MO
Mounting the plate on the rack
This looks amazing. I have a black 125 and did a black out kit too. I love it.
One question I have about the mounting of your universal plate for the topcase. Can you show pictures of how you mounted it? I have one for the soft italia topcase, and the instructions are horrible. I can't figure out how to use all 4 mounting brackets.
Thanks!
One question I have about the mounting of your universal plate for the topcase. Can you show pictures of how you mounted it? I have one for the soft italia topcase, and the instructions are horrible. I can't figure out how to use all 4 mounting brackets.
Thanks!
-
Sassy Chassis

- Member
- Posts: 37
- Joined: Wed Aug 26, 2009 9:45 pm
- Location: Katy/W. Houston
-
MYSCTR
- Member
- Posts: 1007
- Joined: Fri Jun 26, 2009 9:39 pm
- Location: McKinney Texas
Thanks - great tip!Sassy Chassis wrote:Purty!
Get some black wheels with red stripes to complete the look/pull it all together.
Btw, I am envious that you got your rear rack on. Mine is off by at least 1/2 inch from the mounting holes.
Rear racks can test your metal... and everything else. We have found getting one side on just to start the threads then work over to the other side with the center bolt lined up (but not completely on) and ease the opposite side on working the bolt into the hole to help center and find where it goes. This one took some time as we added a new rubber washer under the flat metal washer that we painted the same flat black and did not want to scratch it. Most importtant tip may be to remember to breathe and even walk away and come back when your feeling fresh. Feels good to get them on - we have done 5-6 racks just like this one.
-
cyclewhitman
- Member
- Posts: 31
- Joined: Fri Aug 30, 2013 2:51 am
- Location: Kansas City, MO
Thanks for the tip about mounting the platform to the rack. I decided to go to local scooter works and take a picture of their mounted racks. That helped me tremendously. I still did not mount it just as they had but pretty close. I attached a photo of the mounting from the shop.
- Attachments
-
- IMG_3473.jpg (12.93 KiB) Viewed 3530 times
-
craftynerd

- Member
- Posts: 134
- Joined: Fri Sep 20, 2013 2:32 am
- Location: Bloomington, IN
- Contact:
-
RoadRambler
- Member
- Posts: 181
- Joined: Tue May 31, 2011 2:29 pm
- Location: South of Richmond, VA
-
cyclewhitman
- Member
- Posts: 31
- Joined: Fri Aug 30, 2013 2:51 am
- Location: Kansas City, MO
-
BuddyBliss

- Member
- Posts: 83
- Joined: Sat Mar 05, 2011 10:40 pm
- Location: Spring Mount PA
- Contact:


-
Whimscootie

- Member
- Posts: 606
- Joined: Thu Jul 22, 2010 1:39 pm
- Location: Clermont County, Ohio
One of the coolest and prettiest Buddies I've ever seen!
I really wanted a RED Buddy before I got my Psycho, but I love the "black out" look too!
Just awesome!
I really wanted a RED Buddy before I got my Psycho, but I love the "black out" look too!
Just awesome!
Scootin' for a slower pace of life...
www.49ccscooterlife.blogspot.com
www.49ccscooterlife.blogspot.com
-
MYSCTR
- Member
- Posts: 1007
- Joined: Fri Jun 26, 2009 9:39 pm
- Location: McKinney Texas
Time To Say Good-Bye!
The little red scoot that could is gone – traded this weekend! It will make someone a great fun scooter! We know our daughter really enjoyed the past 5 years riding this scooter – yet is terribly excited about what comes next!