Buddy 125 engine swap
Moderator: Modern Buddy Staff
-
DeeDee
- Member
- Posts: 1107
- Joined: Sat Jul 26, 2014 5:07 pm
- Location: Denver
Buddy 125 engine swap
I just now finished stripping my 125 donor bike. The engine will sit on the shelf until my current 125 (about to hit 19,000 miles) is ready for a new engine. I'm hoping scootERIK would be so kind as to share his knowledge on this topic... Maybe a 6 or 10 point quick and dirty guide to pulling the old engine out, and placing in it's replacement. There wasn't much to gettng the engine out of my donor bike. I was thinking forward when it comes time to place this engine in my daily driver, and thought it would be great to have some notes for doing so. Thank you in advance!
- Attachments
-
- 20230718_105446.jpg (310.57 KiB) Viewed 4509 times
Less chit chat, more riding, Buddy 50, 125, 170i, RH50, Yamaha C3
-
sc00ter
- Member
- Posts: 1148
- Joined: Sun Mar 30, 2008 9:17 pm
- Location: Norfolk VA
Re: Buddy 125 engine swap
Only tips I can give is take a bunch of pictures, mostly how wires and hoses are routed.
Why are you changing the motor at 19,000 miles? Just curious.
Why are you changing the motor at 19,000 miles? Just curious.
-
scootERIK
- Member
- Posts: 716
- Joined: Thu Jul 12, 2012 3:40 am
- Location: Lake Geneva, WI
Re: Buddy 125 engine swap
My basic process is-
Pull the seat and bucket, remove the side trim pieces(the long skinny plastic parts above the exhaust and CVT,) remove the plastic part that sits behind your calves when riding. *
Now you have a choice- remove the rest of the rear plastics or work around them. I would leave them on until you have to remove them. I think you don't have to remove anymore plastic parts but I could be wrong.
Remove the exhaust, remove the nut that hold the rear brake cable to arm(by the rear wheel.)
Unclip the auto choke from the wiring harness, remove the fuel line from the carb, disconnect the intake from the carb, remove the spark plug cap from the spark plug and the spark plug wire from the clip. Remove the rear shock from the CVT case. Remove the rear tire(not needed but it will make the engine lighter.)
At this point the engine should be only held in place by two large bolts. Undo those bolts and it will come right out. I put an old tire below it to catch it.
To install the hardest part is getting those two large bolts back in. It can be done alone but another set of hands makes it much easier. I believe I used some screwdrivers in the holes to get it lined up then replaced them one at a time with the bolts.
Now you just reverse the process. I usually start by hooking up everything the engine needs to run so I can test it.
If you are going to use the carb off the old engine I would probably install the carb after getting the new engine in the frame, but you could install on the new engine before putting it in the frame. That's your choice.
It's not a hard job but it does take a lot of time. When I did my first swap it has close to 10 hours to remove two engines and install one, but that was taking breaks and not working very fast. I was under 6 hours the next time, but I only had to remove one engine. I will be doing another swap in 4-6 weeks so I will update this post if needed.
I think that is fairly complete but if you have any questions let me know.
*You should disconnect the battery, but I never do.
-
DeeDee
- Member
- Posts: 1107
- Joined: Sat Jul 26, 2014 5:07 pm
- Location: Denver
Re: Buddy 125 engine swap
Thank you scootERIK. There's no substitute for expreience. I'll tidy up the engine, and store it on a shelf until needed.
Less chit chat, more riding, Buddy 50, 125, 170i, RH50, Yamaha C3
-
scootERIK
- Member
- Posts: 716
- Joined: Thu Jul 12, 2012 3:40 am
- Location: Lake Geneva, WI
Re: Buddy 125 engine swap
I can now share a little more experience in engine swapping.
A few things to consider doing-
-First remove exhaust and rear wheel, then remove the rear brake cable.
-Now remove the seat bucket.
-Next remove the side covers(the long skinny body panels) you will also have to remove the passenger foot rests. Plus you will need to remove the other screws that you can see that were behind the side covers to allow you to move the panels by the bolts that hold the engine to the frame. You can loosen the bolts that hold the engine in but don't remove them yet.
-Remove the lower shock bolt.
-Now go through and disconnect everything that connects the engine to the frame.
--Fuel line
--Vacuum hose
--negative cable from the starter relay
--the ground(or starter)cable that connects just above the dipstick
--the autobystarter(at the red clip)
--the stator(the plug and two bullet connectors)
--sparkplug cap and the wire from the clip
--the throttle cable
--air intake hose
I think that is all the connections but I might be missing something
Now put an old tire under the engine and remove the two large bolts(brass/gold colored)
Engine should drop down, unless you left something connected.
To install position the new engine on the tire and get it as far up and forwards as you can.
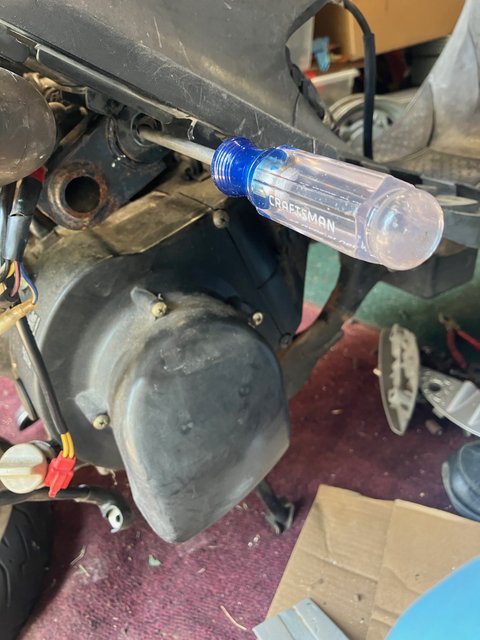
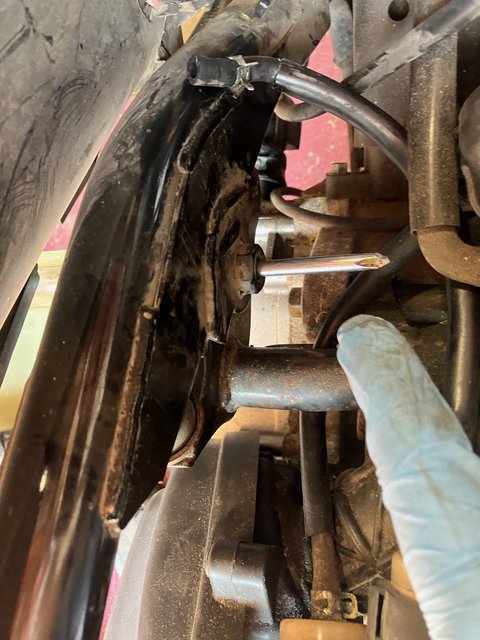
Now for the hardest step, getting the large bolts in that hold the engine to the frame. For me the best method was to step through the scooter and face backwards(butt will be touching the handlebars) then reach down and lift the engine up and to the front of the scooter. You should have two philips screwdrivers by the scooter so when you get the holes close you can stick a screwdriver in the holes to hold it in place(see pictures below.) Once you get a screwdriver in on both sides you can remove one and try to get the bolt in and finger tight then get the other side. Then you can do a final tightening. If you have help this step is much easier, but it can be done by yourself.
Next install the lower shock bolt and tighten. While you are back there reconnect the rear brake cable since it will be much easier without the rear wheel on.
At this point it is just hooking everything back up again.
I keep track of my time on my most recent swap-
Total time to remove the engine was 37 minutes(starting in complete ready to ride condition)
Total time to install engine 1 hour 30 minutes(ending in complete ready to ride condition)
I was going fast on the removal(maybe a little too fast because I didn't have everything unhooked before unbolting the engine.) For the install I went sort of fast, but I was more focused on working in a good order and getting everything installed and tight. I did a pretty good job, only had two extra screws. But after a quick look around I figured out where they went and then was one screw short.(This time isn't included in the above times because I thought I was done, but it was maybe 5 more minutes.) Also, the "new" engine was complete with a carb, airbox, cvt, and stator. If you have to swap parts that will add time.
Previous engine swaps took me a much long time, so if it's your first time I would plan for 4+ hours.
Hopefully that all made sense. If not let me know and I will try to explain it better.
How I use the screwdrivers-

A few things to consider doing-
-First remove exhaust and rear wheel, then remove the rear brake cable.
-Now remove the seat bucket.
-Next remove the side covers(the long skinny body panels) you will also have to remove the passenger foot rests. Plus you will need to remove the other screws that you can see that were behind the side covers to allow you to move the panels by the bolts that hold the engine to the frame. You can loosen the bolts that hold the engine in but don't remove them yet.
-Remove the lower shock bolt.
-Now go through and disconnect everything that connects the engine to the frame.
--Fuel line
--Vacuum hose
--negative cable from the starter relay
--the ground(or starter)cable that connects just above the dipstick
--the autobystarter(at the red clip)
--the stator(the plug and two bullet connectors)
--sparkplug cap and the wire from the clip
--the throttle cable
--air intake hose
I think that is all the connections but I might be missing something
Now put an old tire under the engine and remove the two large bolts(brass/gold colored)
Engine should drop down, unless you left something connected.
To install position the new engine on the tire and get it as far up and forwards as you can.
Now for the hardest step, getting the large bolts in that hold the engine to the frame. For me the best method was to step through the scooter and face backwards(butt will be touching the handlebars) then reach down and lift the engine up and to the front of the scooter. You should have two philips screwdrivers by the scooter so when you get the holes close you can stick a screwdriver in the holes to hold it in place(see pictures below.) Once you get a screwdriver in on both sides you can remove one and try to get the bolt in and finger tight then get the other side. Then you can do a final tightening. If you have help this step is much easier, but it can be done by yourself.
Next install the lower shock bolt and tighten. While you are back there reconnect the rear brake cable since it will be much easier without the rear wheel on.
At this point it is just hooking everything back up again.
I keep track of my time on my most recent swap-
Total time to remove the engine was 37 minutes(starting in complete ready to ride condition)
Total time to install engine 1 hour 30 minutes(ending in complete ready to ride condition)
I was going fast on the removal(maybe a little too fast because I didn't have everything unhooked before unbolting the engine.) For the install I went sort of fast, but I was more focused on working in a good order and getting everything installed and tight. I did a pretty good job, only had two extra screws. But after a quick look around I figured out where they went and then was one screw short.(This time isn't included in the above times because I thought I was done, but it was maybe 5 more minutes.) Also, the "new" engine was complete with a carb, airbox, cvt, and stator. If you have to swap parts that will add time.
Previous engine swaps took me a much long time, so if it's your first time I would plan for 4+ hours.
Hopefully that all made sense. If not let me know and I will try to explain it better.
How I use the screwdrivers-
-
DeeDee
- Member
- Posts: 1107
- Joined: Sat Jul 26, 2014 5:07 pm
- Location: Denver
Re: Buddy 125 engine swap
Awesome! Thank you for taking the time to write this up.
Less chit chat, more riding, Buddy 50, 125, 170i, RH50, Yamaha C3